Monthly Archives: September 2009

More Software fun!

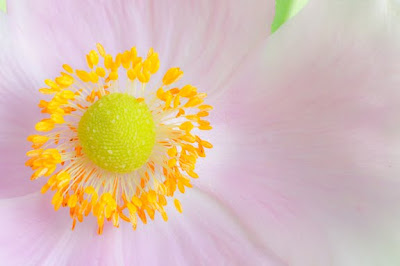
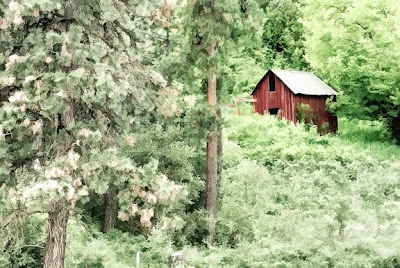
A few blogs back I talked about the role of software in the future of photography. The bottom line was that some understanding (and useage) of software tools is essential to a photographer in the digital age. So in this entry, I thought I would show another before and after of an image where I applied some of the great tools available. The first blog image is actually the final image after processing. The second image shows the initial shot. While the initial shot composition and subject was good, the lighting and tonal spread was not. This resulted in a less than exciting image – but not bad.

To create the final image, I first brought the image up in Topaz Lab’s Simplify ($39). This is where I created the painterly effect. The image at this stage was much more interesting but I decided to play with it more. Next I applied a “Bleach Bypass” filter in NikSoft’s ColorEfxPro. Finally, I applied a touch of “Glamour glow”. While the possibilities are endless, some definitely work better than others – experiment and have fun. In the end, using the tools is an art!
This might give you the impression that if you only had all these tools you could create great images. Let me reiterate that the underlying image must still be fundamentally strong: well composed, have a good defined subject, etc.

Posted in Uncategorized

Making Lemonade

I have been out for a week road tripping. My wife and I enjoy doing that on our vacations. Generally we pick a direction and based on the time we have select a reasonable destination and play it by ear from there. In this case we targeted the California redwoods for the far point with a a return route up the coast or through central Oregon.

As free form as this sounds, at times I will get a bit fixated on a specific area I want to photograph. In this case I wanted do some shooting on the Oregon coast at Bandon. There are a lot of sea stacks there and it is considered by some as the most photogenic beach on the west coast. As it turned out, between the campground being full, clouds and high winds (sand blasting anything on the beach – like your camera). I didn’t get to shoot there as I hoped. Instead I ended up at a place called Sunset Bay beach. As it turned out, there was greate light that evening and I ended up with some really nice images. So while I thought I was getting the lemon, I was really getting the chance to make lemonade.

Bottom line – as a photographer you need to stay flexible and work with what you are handed – it could be some of your best work.
Images:
The first image reminds of some 70’s water color that was on books and cards – remember the 70’s? This image like several others was shot around -2/3 EV to better saturate the colors (more like I saw them). It was also shot well after sunset – it always pays to stick around until you are sure the light show is over. I saw another photographer come and go before the really great light.
The second image was shot earlier, but still after sunset. The colors were more pastel at this point.
The third image was shot the next morning (cloudy/foggy day). The color pallet was totally different – very soft hues – but I still like it.
Posted in Uncategorized

Mausoleum in HDR

Through my photography club I was able to get into a mausoleum that is usually closed to the public. This was somewhat of a good will deal, we provide them with images for their use (a very good deal for them) and the local club consortium gets access for an upcoming field trip.
This is an old mausoleum that has been in Portland quite a while and has sections built over decades. We had only 4 hours to shoot and this was a big place (8 floors with multiple long corridors per level). The lighting was often high contrast, almost non-existent and/or with mixed sources – incadescent, flourescent and daylight. Good candidate for HDR photography.
The HDR shots required from 4-9 shots taken 1-stop apart to capture the total light intensity span. I think 9 may not have been quite enough in some cases. In a couple cases where it was real dark I had to up the ISO to 800 to shoot a sequence in a reasonable amount of time. I had to use the built in camera noise reduction which made shot times even longer.
A first pass at post processing of these images can be seen here. I can play with many of these images for a quite a while to get different results.
I have include a couple HDR images here in the blog. The final image is not HDR, but just a simple pleasant image.
Posted in Uncategorized

Critiques and Clubs


As an artist you inevitably end up placing your work into either competitive or critique situations. This happens when you submit work to art shows, stock agencies and/or galleries. Getting critiqued or having your work judged can take some getting used to. One good way to get some experience handling critiques is to join a photography club. Photography clubs generally provide many opportunities to have you work judged and/or critiqued (my club has both a competition night and a critique night once a month). Having your work critiqued or judged in a club setting can prepare you mentally and emotionally for the critiques that come when you are marketing your work. Clubs are also good place to meet other photographers, get inspired by what they are doing or find out about new places to shoot.

In choosing a photography club (if you have a choice) you might have to visit a couple to decide where you want to stay. If you are to get critiques that you will accept, you need to respect/like the work of those critiquing you. So keep that in mind if you are joining a club for that purpose.
One last note, while winning competitions can be fun. Don’t let it drive your shooting. Be true to what you like and use the critiques to hone YOUR work. Besides, when you make a sale, you really win!
The blog image (HDR image entitled “Train to Oz”) is one I just recently submitted in a club competition. While it didn’t win, it did well. There was some pretty stiff competition. Another image I submitted (seen in a previous blog) did win in the category completion.
Posted in Uncategorized

A change of pace

Just for a change of pace I stopped and shot a couple pictures at the local alpaca farm. I have included a few shots here in the blog. The alpaca’s were generally in the shade (but not always) with a bright sunny background. This creates some challenges for a photographer. Shooting HDR with moving subjects is not really an option (yet) so I decided to let the backgrounds blow out and use a shallow depth of field when possible (f6.3 for most of these shots – allows for some focus error due to animal movement). But the backgrounds don’t totally go white so I had to make some post processing decisions. For the lead image I selected the background and increased the exposure until it went totally white. In the second image I diffused the background and added a vignette.

Have I got a secret for you.

Hey there.

Posted in Uncategorized

Rainy Day

We have a joke here in the NW, “What do you call two rainy days in a row? – A weekend”. We’ve been having beautiful 80 deg weather right up to Labor Day weekend and what do you know, two days of rain so far with 80 deg weather forecast for Tuesday. I had planned to go out and shoot this morning in the garden, but it was too windy and rainy to do that. So I went out to the garden and cut a couple of the flowers, the ones I had planned to shoot outside, and took them in doors. The blog images are from that shoot – what follows is a brief outline of how I created the images.

First, after cutting the flowers and putting them in a small vase with water, I set up a small table next to the window as shown – it was cloudy so the light was nice and diffused. I have a set of fabrics on a rod that I use for backgrounds on such occasions (al a Tony Sweet’s studio). In this case I chose a light spring green. Second, I popped a Lensbaby 3G on my D300 and proceeded to create. I used a f4 aperture ring on the Lensbaby and in general used the push method where you extend the Lensbaby bellows instead of compressing it. I moved the flowers as needed to create compositions that seemed pleasing to me. I also needed to use a small reflector to fill in some of the shadows (a white sheet of paper does the trick). Later I put on a 50mm lens with an extension tube to do more closeup work. Note, I also used a tripod and cable release as feasible. Once I had the images I wanted, I went through a set of post-processing steps as needed.
  1. Load image into Lightroom and sort through the images in the Library mode to find ones you want to develop (discard the rest). Go to the Develop mode.
  2. Adjust the Exposure slider to the right until the histogram is to the right without blowing out the whites. I do this for creating a light airing feeling – called “high key” lighting.
  3. Use the Fill Light slider to get rid of “black holes” – they tend to draw your eye. Try to avoid these with the reflector during the shoot.
  4. If there are some really dark areas, you may need to use the Adjustment Brush to select an area and increase the local exposure and/or brightness.
  5. Use the clone tool to remove imperfections from the flowers – brown spots just don’t look good (the flowers you cut should be as pristine as possible).
  6. In a soft focus image like this, I might use the Adjustment Brush to select the focal point (one focused area where the eye can rest) to add some Clarity and/or Sharpness.
The final image is one shot with the 50mm lens with a little diffusion added in post processing.
Posted in Uncategorized

Back in the Saddle


Well this week I submitted two bodies of work to a local cultural arts center for a possible exhibition next year. Just after picking up my rejected material from the local coop gallery last week my wife and I stopped by the cultural arts center. We happened to catch the curator there setting up the next exhibit. While the primary call to artist for next year’s exhibits was over, the curator did say that if I brought something in it may be taken in as a late submittal. So I submitted two bodies of work – People of the Plateau and Simple Impressions. These are very different bodies of work. Given the quick turn time I didn’t have the usual time to research what type of work they usually accept. We will see. But the arts center is in a bigger town and a bit more progressive. That leads me to an additional comment on the coop gallery rejection.

After talking with the coop gallery jury foreman, it quickly became apparent that even though I had asked specifically about the galleries recent decline in photographic work, the answer was not correct. It turns out that photographic work had not been selling well so they were really not inclined to accept new photographic work. In addition, it appears the jury foreman was somewhat new to that position. Unfortunately that is who I talked to the most before choosing a body of work. This is a small town and without going into specifics, the jury “just didn’t get it” when it came to several of the impressionistic images. So live and learn.
As for the Cultural Arts Center submission, only time will tell. While a show there will not necessarily result in direct sales, it does increase your name recognition and may result in indirect sales on your website.
The blog image is a promo I created for the People of the Plateau. I gave a copy of this to the curator hoping he would hang it on the bulletin board in his office he mentioned the week before. Click here if you haven’t visited my People of the Plateau website gallery before to see more.
Posted in Uncategorized